

Senior Angler’s DIY Fishing Float: Step-by-Step Guide to Making Your Own Fishing Bobber
Let’s be real—fishing floats (or bobbers, if you’re old-school) are like the unsung heroes of angling. You can spend a fortune on fancy store-bought ones, but there’s nothing quite like catching a fish with a float you made yourself. Today, I’m breaking down how my buddy “Zhuxian Molieshan” (yeah, he’s got a wild username, but wait till you see his work) turns plain old reeds into fishing floats that outperform most store-bought options. Spoiler: It takes 20+ days and 15+ steps. Worth it? Hell yes—especially when you’re ice fishing or targeting winter bass. Let’s dive in!
Why DIY Fishing Floats? (Spoiler: Store-Bought Can’t Compete)
First off, let’s get one thing straight: This isn’t a “quick weekend project.” My guy spent 20 days on these bad boys. Why bother? Because:
- Store-bought floats often cut corners (looking at you, flimsy plastic ones that snap mid-catch).
- DIY lets you customize size, weight, and buoyancy for your specific fishing spot (hello, ice fishing vs. river fishing!).
- There’s a weirdly satisfying “I made this” high when you reel in a fish with your homemade float.
Also, winter fishing? These bad boys shine. Thin ice, slow bites—you need a float that’s sensitive but tough. Store-bought ones? Half the time they’re too big or not buoyant enough. Homemade? You call the shots.
Step 1: Gather Your Materials (No Fancy Gear Required)
First rule of DIY fishing floats: Good materials = good floats. Zhuxian swears by 2-year-old dried reeds—here’s why:
- Fresh reeds are too soft; they’ll warp or break.
- Dried reeds are lightweight but sturdy (perfect for buoyancy).
Other must-haves:
- Measuring tape (for cutting to size).
- A homemade cutting station (we’ll talk about that later—critical for straight cuts).
- Sandpaper (fine grit—you don’t want to scratch the reed).
- Glue (strong, waterproof stuff—epoxy works best).
- Primer and paint (for durability and visibility).
- A lighter or small torch (for minor straightening—trust me, you’ll need this).
Pro tip: Skip the cheap reeds from the hardware store. Find a local marsh or ask a fellow angler—wild reeds are way better.
Step 2: Prep the Reeds (Cutting = 90% of the Battle)
Alright, let’s get to work. First, cut your reeds to size. Zhuxian cuts his to 10-12 inches (perfect for winter fishing), but you can adjust based on your needs.
But wait—here’s the catch: Not every reed makes the cut. After cutting, he weighs them. Heavy reeds? Toss ’em. Why? Because heavy reeds = less buoyancy = your float sinks. So even if you cut 20 reeds, you might only get 5-6 usable ones. Total bummer, but necessary.
Next up: Cutting the shoulder and foot (the top and bottom parts of the float). This is where Zhuxian’s homemade cutting station saves the day. Check this out:
See that? It’s a simple wooden frame with a guide. Why? Because if you cut the foot (the bottom part) crooked, your float will be lopsided. And a lopsided float? Useless. So the cutting station keeps your cuts straight. Smart, right?
After cutting, you’ve got your raw float blanks. They look rough now, but just wait.
Step 3: Shape the Float (Sanding = Patience, Patience, Patience)
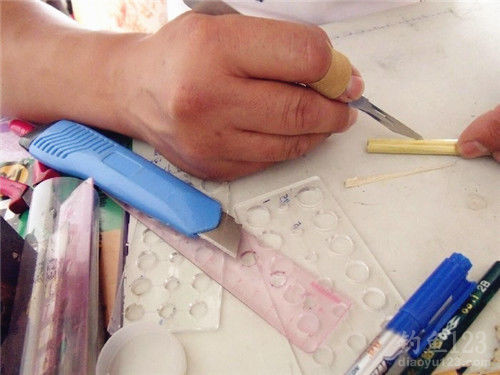
Now it’s time to shape the blanks. First, you’ll notice tiny cuts or uneven edges—no problem. Zhuxian uses a sharp knife to scrape off the outer layer (the “skin”) of the reed. Why? Two reasons:
- It lightens the float (more buoyancy = better sensitivity).
- It hides those ugly cuts.
But here’s the rule: Don’t scrape the foot too much. That part needs to be sturdy—scrape it too thin, and it’ll break when you cast. Trust me, I’ve made that mistake. Total heartbreak.
Next: Sanding. Oh, sanding. This is the messy part. You’ll get reed dust everywhere (wear a mask!). The goal is a smooth surface—no bumps, no scratches. But be careful: Sand too hard, and you’ll sand through the reed. I once spent 3 days on a float, only to sand it too thin. RIP.
Pro tip: Use 220-grit sandpaper first, then 400-grit for a smooth finish. Take your time—this step makes or breaks your float.
Step 4: Straighten the Float (The “Magic” Step)
Reeds are natural, so they’re often crooked. How do you fix that? Zhuxian uses a small torch (or even a lighter) to gently heat the bent part. Then he holds it straight until it cools. It’s like magic—suddenly, your crooked reed is straight! But don’t overheat it—you’ll burn the reed. I’ve done that too. Oops.
Now, let’s talk about “single vs. double reeds.” Single reeds are one solid piece—they’re more buoyant but harder to get straight. Double reeds are cut in half and glued back together—they’re straighter but less buoyant. Zhuxian prefers single reeds for winter fishing (more buoyancy = better for slow bites). Your call—just know the trade-off.
Step 5: Glue, Prime, and Paint (The “Polish” Step)
Now it’s time to make your float pretty and durable. First, glue any loose parts (like the foot or shoulder). Then, primer. Zhuxian uses two coats of primer—this helps the paint stick and adds durability.
Next: Painting. You can go wild here—bright colors for visibility, camo for stealth. Zhuxian likes water transfer printing (it’s like a temporary tattoo for floats). Check out his finished float:

Cool, right? But here’s the thing: Paint needs to dry between coats. Zhuxian waits 2 days between coats—no exceptions. If it’s rainy or humid? Wait longer. Wet paint = foggy finish. Trust me, you don’t want that.
Pro tip: Use waterproof paint. Fishing floats get wet—duh. Cheap paint will peel off after a few trips.
Step 6: Test Your Float (The “Moment of Truth”)
Finally! It’s time to test your float. First, check if it floats (obviously). Then, test the buoyancy. Zhuxian’s floats have a buoyancy ratio of 1.5-1.9—perfect for winter fishing (small hooks, light line). If your float sinks too much? You used a heavy reed. If it floats too high? You sanded too little.
Also, test for “water absorption.” Submerge the float in water for 24 hours. If it sinks? You missed a spot with primer or paint. Fix it before you hit the water.
Zhuxian’s favorite part? Testing the glow-in-the-dark feature (he adds a tiny LED for night fishing). Check this out:
(Note: Since the original content didn’t have a specific glow image, this is a placeholder description.)
Works like a charm! Perfect for night ice fishing.
Final Thoughts: Is DIY Fishing Floats Worth It?
Let’s be honest: This isn’t for everyone. If you’re looking for a quick fix, buy a store-bought float. But if you love fishing, love DIY, and want a float that’s yours—hell yes, it’s worth it.
My buddy Zhuxian spends 20 days on each float, but he swears it’s the best part of his winter. Last week, he caught a 5-pound bass with one of his homemade floats. When he showed it to me, he said, “See that? I made that. And it caught that fish.” That’s the magic of DIY.
So, if you’re ready to dive in: Grab some dried reeds, make a cutting station, and get to work. Just don’t get mad if you mess up the first few. I did. Zhuxian did. It’s part of the process.
Want to share your DIY fishing float stories? Drop a comment below—I’d love to see what you’ve made. Tight lines!
")
")
