
")
DIY Fishing Gear: Crafting a Hardwood Baitcasting Handle (My Obsession Continues)
Let me tell you—fishing has its own kind of “addiction,” but DIY fishing gear? That’s a whole other level. I’ve been messing around with making my own rod handles lately, and after nailing some bamboo ones, I thought, “Why not go bigger? Why not try hardwood?” Spoiler: It was way more fun (and a little chaotic) than I expected. This isn’t a fancy product—just a DIY project for fellow gear nerds to check out. Let’s dive in!
Why Hardwood? (And How I Found the Perfect Piece)
Okay, so summer fishing here is usually awesome—great bites, sunny days, the whole shebang. But this year? Life (and weird weather) got in the way. No fishing trips. Nada. I was stuck at home, staring at my old rods, thinking, “This is boring.” So I did what any restless angler would do: I hit up the local Chinatown market. I’d heard they had random treasures, and sure enough—there it was: African blackwood. It looked like it was practically made for a baitcasting handle. Perfect shape, not too pricey, and I thought, “Heck, let’s make this happen.”
The market was tiny but packed—tiny trinkets, weird tools, all kinds of stuff. I almost left empty-handed, but then I spotted the blackwood. It was like the universe was yelling, “This is your sign!” So I grabbed it. Let’s just say my “walk for exercise” turned into a gear-hunting mission. Worth it.
Step 1: Sketching the Vision (No, I Didn’t Use a Fancy CAD Program)
First, I needed a plan. I didn’t pull out some fancy design software—just a pencil and the wood. I mapped out the handle: main grip around 25mm thick, the bend (for the trigger) about 30mm. Simple, right? But here’s the thing: I’m not a pro carpenter. I’m just a guy who likes fishing and messing with wood. So I kept it basic but functional.
Wait, here’s a pro tip (or a “don’t do what I did” tip): Measure twice, sketch once. I almost messed up the trigger bend because I was in a hurry. Oops. Take your time here—this part sets the whole thing up.
Step 2: Rough Shaping (AKA “The Chaotic Knife Phase”)
Next up: roughing out the shape. I used a sharp utility knife (okay, maybe a little too sharp) to trim the excess wood. This is where patience is key. I didn’t just hack away—small cuts, check the shape, repeat. The wood was dense, so it took a minute, but it was satisfying to see the handle start to take form.
Here’s a little secret: I almost sliced my thumb. Twice. So wear gloves, folks. Safety first, even when you’re excited about a new DIY project. I learned that the hard way (pun totally intended).
Step 3: Splitting the Wood (Double the Fun, Double the Work)
Now, the original piece was about 50mm thick. Instead of grinding it all down (which would’ve been a waste of good wood), I thought, “Why not split it? Two handles for the price of one!” Genius, right? So I carefully marked a line down the middle and split it with a chisel and mallet. It took a few taps, but it split cleanly. Double the handles, double the fun later. Win-win.
Pro move: Use a straight edge to mark the split line. I didn’t at first, and one piece was a little lopsided. Oops again. Learn from my mistakes!
Step 4: Shaping with a Dremel (The “Slow and Steady” Phase)
Time for the Dremel! This is where the handle starts to look like a handle, not just a weirdly shaped stick. I used a sanding drum to smooth out the rough edges and get the curves just right. Here’s the thing: Don’t rush this. If you press too hard, you’ll gouge the wood. I’d sand a little, stop, check the shape, sand some more. It took hours, but it was worth it. The blackwood has this beautiful dark grain—you don’t want to mess that up with a bad sand job.

Another tip: Wear a mask. Wood dust is no joke. I forgot at first and ended up coughing for an hour. Not fun. Protect your lungs!
Step 5: Adding Details (Bamboo Lines and Trigger Shapes)
Now for the fun part: details! I wanted the handle to have a bamboo look (since I love bamboo rods), so I drew thin lines where the bamboo “nodes” would be. Then I used a small file to deepen those lines—about 2-3mm deep. This gives the handle texture so it doesn’t slip when your hands are wet (super important for fishing).
For the trigger (the bent part), I used a smaller sanding drum to get the curve just right. I wanted it to fit comfortably in my finger, so I tested it a lot. If it doesn’t feel good in your hand, what’s the point? I adjusted it probably 10 times before I was happy.
Step 6: Attaching the Reel Seat (Glue = Your Best Friend)
Next up: attaching the reel seat. The seat needs to fit snugly, so I measured the diameter and sanded the wood until it was exactly 20mm. Then I slid the seat on, added a drop of strong wood glue, and clamped it down. I let it dry overnight—no shortcuts here. If the seat comes loose while you’re fishing, you’re gonna have a bad day (and possibly lose a lure or two).
Two Designs: Hollow vs. Full (Which One Do You Prefer?)
I ended up making two different designs with the split wood: a hollow version and a full version. Let’s break ’em down:
Hollow Version
The hollow one has those bamboo lines I mentioned, and it’s lighter. Great for all-day fishing—less fatigue. It looks sleek, too. I sanded the inside to make sure there were no rough edges, then gave it a light coat of wood oil to bring out the grain. So pretty!
Full Version
The full version is a little heavier, but it feels solid. No hollow parts—just dense blackwood. It’s perfect for anglers who like a more substantial grip. I also sanded this one smooth and added the same wood oil. Both look amazing, if I do say so myself.

Which one do I like better? Hard to say. The hollow one is more comfortable for long days, but the full one feels like a tank. Maybe I’ll switch ’em up depending on the fishing trip!
Bonus: The Screw-On Spool Version (A Little “Wild” Design)
Oh, and I couldn’t resist making a third one—this time with a screw-on spool. It’s a little… weird. The shape looks a bit like a snake (no joke). I joked with my friend that it might scare people during night fishing. But hey, it’s unique! It has that “old-school” vibe, which I love. Sometimes the weirdest designs turn out to be the most fun.
Finishing Touches: Sanding and Oiling
After all the shaping and gluing, I did a final sanding with 400-grit sandpaper to make the wood super smooth. Then I applied two coats of food-safe wood oil (just in case I ever touch it with wet hands—better safe than sorry). The oil brought out the blackwood’s deep color and grain—wow, it looked amazing. I couldn’t stop staring at it.
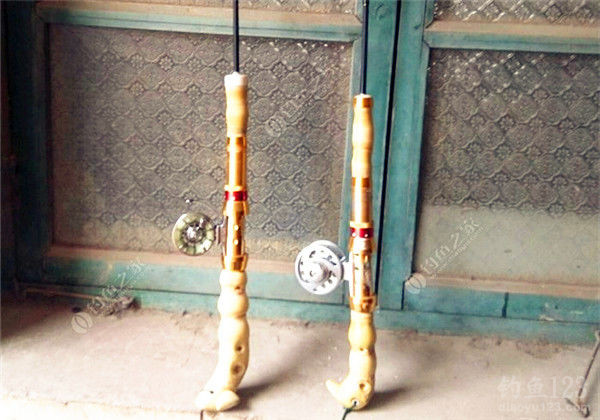
Double Trouble: Two Handles, One Awesome Project
Remember when I split the wood? That gave me two handles. So now I have a “double trouble” set—two custom hardwood baitcasting handles ready to go. I’m planning to take them to the local reservoir soon to test them out. Fingers crossed they hold up! I’m already imagining catching a big bass with my DIY handle. That would be so cool.

To all my fellow anglers: If you’re bored and can’t fish, try DIY gear. It’s a great way to pass the time, and you’ll have something unique to show off. Just be careful with the tools (like I didn’t at first).
Oh, and if you try this project, let me know how it goes! I’d love to see your creations. Stay tuned for more DIY fishing posts—I’m already brainstorming my next project (maybe a custom rod blank? Who knows).
Happy fishing (and DIY-ing)! 🎣


 in Summer: Best Baits, Tackle, and Night Fishing Tips")


