

DIY Bamboo Fishing Rod: A Step-by-Step Guide to Handmaking Your Own Telescopic Pole
Let me start with a confession: my first attempt at making a bamboo fishing rod was a total disaster. 🤦♂️ I remember selecting some random bamboo sticks, peeling off the outer layer to “lighten” it up, and… boom—turns out, removing the skin made the rod so brittle it snapped when I just looked at it wrong. That was one sad, useless pole collecting dust in my garage for years. Fast forward a few years, though, and I decided to give it another shot. This time, I followed proper steps, and now I’ve got a functional (and way cooler) bamboo rod that actually catches fish! If you’ve ever thought, “Can I really make my own fishing gear?”—the answer is YES. Let’s dive into how I did it, mistakes and all!
Why Bamboo? (And Why I Almost Ruined My First Rod)
First, let’s talk about why bamboo is perfect for DIY rods. It’s lightweight, naturally flexible, and strong when properly prepared. Plus, it’s sustainable—you can find bamboo in most regions, and it’s way cheaper than buying a fancy carbon fiber rod. But my first mistake? I ignored the basics: fresh bamboo has too much moisture, and straightness matters. I picked too-thick, green bamboo (not dry enough), peeled the skin (which weakened the structure), and my rod turned into a splintery mess. Lesson learned: patience and preparation are key!
Step 1: Choosing the Right Bamboo (Critical for Success!)
Before you start hacking away at bamboo, you need the right material. Here’s what I learned the hard way: 🌱
- Growth Age: Pick bamboo that’s at least 2 years old. Younger bamboo is too flexible and thin; 2-year-old stalks are thicker, stronger, and less prone to warping.
- Air-Dried for 1+ Year: Moisture is the enemy of straight bamboo! Find stalks that’ve been air-dried for at least a year. I lucked out and found some that’d been stored in a shed for 18 months—their texture felt solid, not spongy.
- Straightness Check: Inspect every inch! Even a tiny curve can turn into a big problem later. Look for stalks with natural bends you can work with (like a gentle “S” curve) rather than sharp angles.
- Thickness Variation: For a 4-section rod (my goal), I needed one thicker stalk for the handle and thinner ones for the sections. The handle should be 10-15% thicker than the other parts—it gives better grip and strength.
Pro tip: Avoid bamboo with cracks, holes, or visible insect damage. Trust me, those will only get worse during the drying process! Once you’ve picked your bamboo, time to prep those nodes.

Step 2: Bamboo Node Drilling—The Unsung Hero of Straightening
Here’s where my first failure haunts me less: nodes (the joints) are the weak spots if not properly handled. Bamboo has air pockets at each node, and if you don’t drill them out, the rod will “explode” when you try to straighten it with heat. Here’s how to fix that:
- Find a Sharp Tool: I used a steel drill bit (1/8 inch) with a pointed tip, but you can also use a nail or a rebar with a sharp end. Attach it to your drill (or use a handheld awl if you don’t have power tools).
- Drill Through Every Node: Position the bamboo on a sturdy surface and drill straight through each node. Go slow—nodes are hard, and you don’t want to bend the bamboo!
- Why This Matters: Drilling removes the air inside the nodes, so when you heat the bamboo, the air can escape safely. No drilled nodes = cracking, warping, or total failure. (RIP, my first rod…)
After drilling, give the bamboo a good wipe-down to remove dust and debris. Now, let’s get to the fun part: straightening!
Step 3: Charcoal Heating—The Magic to Bend (Not Break) Bamboo
Ah, the “I almost burned my house down but it worked!” step. 😅 If you want a rod that doesn’t look like a rainbow, charcoal heat is your best friend. It’s low, even, and gives that “natural” finish without uneven burning.
- Prepare Your Heat Source: Set up a small charcoal fire or use an electric stove (I know, but charcoal is better). If using a stove, prop the bamboo on stands so it’s not touching the flames.
- Distance & Timing: Keep the bamboo 20cm away from the heat. Too close, and it’ll char; too far, and you’ll just waste fuel. Rotate the bamboo every 5-10 seconds to heat evenly. Do this 3-4 times, until you see the bamboo “sweat” (that’s the sap, baby!).
- Straightening Pressure: Once it’s warm and pliable, quickly push/pull in the opposite direction of the curve. Think of it like bending a flexible ruler—slow, steady, and gentle! I pressed for about 10 seconds each side, then let it cool for 5 minutes.
- Finish with Filing: After straightening, use a fine steel file to sand down any rough edges or “lumps” around the nodes. This makes the rod smooth and prevents snagging your line later.
Pro warning: Wear gloves! Charcoal burns hot, and you’ll be tempted to rush—don’t! Rushing leads to uneven heat, which means warping later. Take your time, and you’ll thank yourself when you cast your first line.

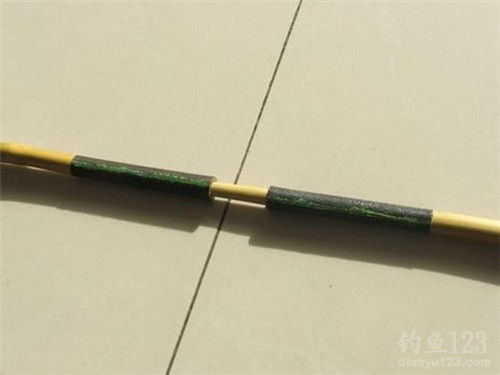
Step 4: The All-Important Interface—Where Your Rod Actually Connects
Now, the part that separates a “hobby rod” from a “working rod”: the interface (joints). If the joints are weak, your rod will fall apart mid-fish. Here’s how to make them unbreakable:
- Clean the Joints: Sand down the ends of each section to make them smooth. The male end (the part that fits into another) should be slightly smaller than the female end (the socket).
- Wrap with Strong Thread: Use fishing line or nylon thread (8-10 strands, tightly woven). Wrap the male end in a spiral, leaving a 8-10cm section. The thread adds friction and “grip” for the glue.
- Apply Resin Glue: Use epoxy resin glue (not super glue—it’s too brittle!). Apply a thin layer over the wrapped thread, then let it dry for 24 hours. Resin is waterproof and flexes with movement, so it won’t crack under stress.
- Test the Fit: After drying, insert the male end into the female socket. If it’s loose, add more glue and wrap a bit more thread. If it’s too tight, sand the male end slightly until it slides in smoothly.
Pro tip: Use 5-minute epoxy if you’re in a hurry, but 24-hour resin is better for strength. I once used super glue and the joint cracked after 3 casts—never again! Save yourself the hassle and use quality glue.
Step 5: Handle Construction—Comfort is Key (No Blisters Allowed!)
Your handle is where your hand rests for hours—so make it ergonomic! Here’s how I designed mine:
- Shape the Handle: The handle should be 15-20cm long, with a slight taper (wider at the bottom, narrower at the top). Use a sharp knife to carve the shape, then sand with 120-grit sandpaper.
- Add a Non-Slip Grip: Wrap the top 5cm of the handle with rubber tubing or fishing line (I used 3 layers of braided fishing line for grip). This prevents slipping when wet.
- Secure the Rod Socket: If you’re making a “fixed” handle (where the rod doesn’t separate), drill a hole through the handle and rod to insert a metal pin for extra strength. If you want detachable handles, use the same thread/glue method as the joints.
I personally prefer detachable handles because it’s easier to store, but fixed handles are sturdier. Test which one works for your needs—maybe even try both!
Step 6: Finishing—Sanding, Painting, and Protecting Your Rod
You’re almost done! The final steps make your rod look pro and last longer. Here’s my finishing routine:
- Final Sanding: Use 220-grit sandpaper to smooth every inch. Focus on the joints and handle—these are the spots that rub against your hands and line. No rough edges = no blisters!
- Seal with Varnish or Paint: I used natural tung oil (my favorite) because it keeps the bamboo’s natural color and adds a waterproof layer. If you want a different look, automotive clear coat works too (just make sure it’s non-toxic for fishing!).
- Protect the Paint: Apply 2 coats of varnish, letting each dry for 12 hours. Sand lightly between coats with 400-grit paper for a glass-smooth finish.
Pro tip: Let the varnish cure in a dry, cool place for 3-4 days before use. Rushing this step will make the finish peel off when you cast your line. Trust me, I’ve done that too… (another oops moment!)

Final Thoughts: Why DIY Bamboo Fishing Rods Are Worth It
After all the trials, errors, and a few burnt fingers, I now have a rod that I’m proud to use. The best part? It cost me less than $50 (bamboo, glue, and tools) and took 2 weekends to complete. Plus, there’s something about holding a rod you built with your own hands that makes every catch feel even more special. 🎣
My advice? Start small—maybe a 2-section rod first—and take notes of what went wrong. I still cringe when I think about my first pole, but now I can pass on the knowledge to you! Whether you’re a fishing enthusiast or a DIY nerd, this project is a great way to learn, create, and save money. Just remember: patience, quality materials, and slow, steady work are the keys to success.
Have you tried making your own fishing gear? Share your fails and wins in the comments below—I’d love to hear your journey! And if you’re ready to start, grab some bamboo, a drill, and let’s make something awesome. Happy fishing (and DIY-ing)! 🎣
Note: Always respect local fishing regulations and bamboo harvesting laws. Never take bamboo from protected areas—sustainability matters! If you’re new to DIY, consider starting with a smaller project, like a bamboo fishing pole holder, before jumping into the full rod.


")

")