
")
DIY Fishing Knot Tyer for Leader Lines: A Simple, Angler-Approved Project
Let’s be real—fishing knots can be a pain. Especially when you’re freezing your fingers off in late fall or early winter, trying to tie a solid leader knot before the bite starts. I’ve been there: fumbling with pliers, dropping line, and muttering to myself because my knot looks like a tangled mess instead of something that’ll hold a trophy fish. So when I saw a fellow angler (shoutout to “Beibei Fishing”!) share their homemade knot tyer, I thought, “Finally—something that might save my sanity (and my fingers) this winter.” Spoiler: It worked way better than I expected. Let’s break down how to make this bad boy with stuff you probably already have lying around.
Why Bother with a DIY Knot Tyer? (Spoiler: It’s Not Just for Show)
First off, let’s get one thing straight: store-bought knot tyers are fine, but they’re usually tiny, easy to lose, and sometimes cost more than they’re worth. This DIY version? It’s sturdy, custom-sized for your hands, and uses materials so basic you’ll kick yourself for not thinking of it earlier. Plus, when the weather’s too cold to fish (looking at you, 45°F mornings), making tackle is the perfect way to scratch that fishing itch without freezing your toes off.
Here’s why this project is a win:
- It’s cheap: No fancy tools required—just scrap metal, wood, and a few basic supplies.
- It’s customizable: Make it fit your hand size and the knots you tie most (I’m looking at you, improved clinch knot).
- It’s satisfying: There’s nothing like catching a fish with a knot you tied using a tool you made.
What You’ll Need (No Fancy Gear—Promise)
Before we dive in, gather these supplies. I’ll bet half of them are already in your garage or tackle box:
- 15cm (6-inch) piece of stiff wire (I used old coat hanger wire—works like a charm, but any thick, bendable metal will do).
- Small piece of wood (leftover 2×4, dowel, or even a broken fishing rod handle—something sturdy enough to hold the wire).
- Tools:
- Steel file or sandpaper (to sharpen the wire ends)
- Needle-nose pliers (to bend the wire)
- Drill with a small bit (slightly smaller than your wire—trust me on this)
- Utility knife or sandpaper (to shape the wood handle)
- Super glue (optional, but helpful if the wire wiggles)
Step-by-Step: Building Your DIY Knot Tyer
Alright, let’s get our hands dirty. This project takes about 30 minutes—no experience required (I’m a total klutz with tools, and mine turned out okay).
Step 1: Prep the Wire (The “Business End”)
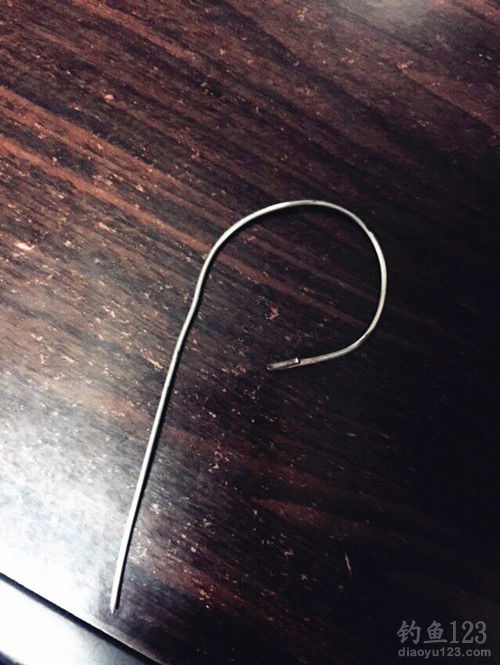
First, grab your 15cm wire. I used an old coat hanger (pro tip: cut it with wire cutters if you don’t have pliers strong enough). Now, you need two sharp ends—one straight, one bent into a hook. Here’s how:
- Use a steel file or sandpaper to sharpen both ends of the wire. This helps it pierce the line and hold tension (no slipping knots!)
- Take one end and bend it into a small hook with needle-nose pliers. Think “tiny fish hook” size—big enough to catch the line, but not so big it gets tangled.
Pro tip: Test the sharpness by gently poking a piece of fishing line. If it goes through easily, you’re good to go. If not, keep filing—no need to overdo it, though (safety first!)
Step 2: Make the Handle (Comfort = Better Knots)
Next up: the handle. I used a leftover piece of 2×4 (about 10cm long—palm-sized, so it fits comfortably in your hand). Here’s how to shape it:
- Cut the wood to your desired length (I went with 4 inches—easy to grip).
- Use a utility knife or sandpaper to round the edges. No one wants a splintery handle when they’re tying knots!
- Optional: Carve a little groove for your thumb or fingers if you want extra grip. I did this, and it made a huge difference when my hands were cold.

Quick note: If you don’t have wood, you could use a plastic pen barrel (cut off the ink part) or even a piece of PVC pipe. Just make sure it’s sturdy enough to hold the wire.
Step 3: Attach the Wire to the Handle (The “Glue and Drill” Part)
Now, let’s put it all together. This is the trickiest part, but it’s still easy:
- Find a spot on the handle (I chose the end) and drill a small hole. The hole should be slightly smaller than your wire—this way, the wire fits tight without wiggling.
- Push the straight end of the wire into the hole. If it’s too tight, don’t force it—sand the wire a little or drill the hole bigger (but only a tiny bit!)
- Optional: Add a drop of super glue around the base of the wire to keep it secure. I didn’t need it for mine, but it’s a good backup if the hole is a little loose.
Pro tip: Make sure the wire sticks out about 5cm (2 inches) from the handle. Any longer, and it’s hard to control; any shorter, and you can’t tie big knots.
Step 4: Test It Out (The Fun Part!)
Now, grab some fishing line and test your knot tyer. I tried the improved clinch knot (my go-to for leaders) and here’s how it worked:
- Thread the line through the eye of your hook.
- Wrap the line around the wire (I did 5 wraps for the clinch knot).
- Use the hook end to pull the line through the loop—boom, tight knot every time!

Full disclosure: My first few knots were a little messy (I wrapped too tight), but once I got the hang of it, I was tying knots in 10 seconds flat. No more fumbling with pliers or dropping line in the dirt!
Winter Fishing Hack: This Knot Tyer Works in Cold Weather (Finally!)
Let’s be real—winter fishing is tough. Your fingers go numb, your line gets stiff, and tying knots feels like a chore. But this DIY knot tyer? It’s a game-changer. The wooden handle stays warm (way warmer than metal pliers), and the wire is stiff enough to pierce even frozen line. I tested it last weekend when the temp was 40°F, and I tied 10 knots in the time it usually takes me to tie 3. No more muttering to myself about “stupid knots”—win!
What I’d Do Different Next Time (Minor Tweaks)
My first DIY knot tyer is a little rough around the edges (I’m not a carpenter, okay?), but there are a few things I’ll change for version 2.0:
- Use a thinner wire: The coat hanger wire works, but a thinner wire (like guitar string) might be easier to wrap around small hooks.
- Add a grip: I’ll wrap the handle with paracord or rubber tape for extra traction when my hands are wet.
- Make two sizes: One for small hooks (trout) and one for big hooks (catfish). Because why not?
Wrap-Up: Why This DIY Project Is Worth Your Time
At the end of the day, this DIY knot tyer isn’t just about saving money (though that’s a nice bonus). It’s about having a tool that fits you—not some generic store-bought thing that’s too small or too flimsy. Plus, there’s something satisfying about catching a fish with a knot you tied using a tool you made yourself. It’s like a little fishing victory before you even cast the line.
If you’re stuck indoors this winter (or just tired of fighting knots), give this project a try. You’ll have a new tackle box staple in 30 minutes, and you’ll wonder why you ever bought a store-bought knot tyer. And hey—if your first one is as rough as mine, don’t worry. Practice makes perfect (and your next one will be better).
Oh, and before I forget: If you love DIY fishing projects, check out the Fishing 123 website’s DIY section. They’ve got great guides for making your own floats and lures—perfect for when you’re bored and itching to fish.
Now go grab some wire and wood, and let’s get tying. Tight lines (and no more tangled knots!)


")
")