
")
How to Store Leftover Red Worm Fishing Bait Properly (My Proven Method)
Let’s be real-if you’re a fishing enthusiast, red worms (or “red wigglers” as some call ’em) are your ride-or-die bait. They’re irresistible to bass, trout, catfish, and just about every other freshwater fish out there. But here’s the thing: red worms ain’t cheap these days. I swear, every time I hit the bait shop, the price tag’s higher than my last fishing trip’s gas bill. And let’s not even talk about the hassle of buying new ones every single time you head out-who’s got time for that?
A few years back, I’d just toss leftover red worms in a random container, forget ’em, and find a mushy, stinky mess a week later. Total waste of money, right? So I started experimenting with different storage methods, and let me tell you-after months of trial and error (and a lot of dead worms), I finally landed on a system that works. My leftover red worms last for weeks (even through winter!) with barely any casualties. Today, I’m spilling all the tea on how I do it-no fancy gear, just stuff you probably already have at home.
Why Storing Leftover Red Worms Matters (Beyond Saving Cash)
First off, let’s get the obvious out of the way: saving money. If you’re buying a $10 cup of red worms every time you fish, and you only use half, that’s $5 down the drain every trip. Multiply that by 10 trips a year? That’s $50 you could’ve spent on new lures or a better fishing rod. But it’s not just about cash-fresh, lively red worms catch way more fish than dead, mushy ones. If your bait’s half-dead, you’re basically just throwing a snack at the fish instead of a tempting, wiggly meal. So storing them right keeps ’em lively, which means more bites for you. Win-win.
My Step-by-Step Red Worm Storage Method (No Fancy Tools Needed)
Okay, let’s get to the good stuff. This method’s super simple-you don’t need a fancy bait fridge or expensive containers. Just grab a few household items, and you’re set. Let’s break it down step by step.
Step 1: Prep the “Wash Station” (Get Those Worms Clean!)
First things first: you need to wash your leftover red worms. Why? Because any leftover fish slime, dirt, or debris from your last trip will rot and kill your worms. Trust me, I learned this the hard way-once I skipped washing, and woke up to a container full of stinky, dead worms. Gross.
Here’s what to do: Grab a small, clean container (a plastic food storage container works great-no need for anything fancy). Fill it with room-temperature water-don’t use cold water straight from the tap, it’ll shock the worms. Now, pour your leftover red worms into the container. Give ’em a gentle swish-don’t be rough! Worms are delicate little guys.
Let ’em soak for a minute or two, then pour out the dirty water (use a fine mesh strainer if you’re worried about losing worms-pro tip, I keep a cheap strainer just for this). Repeat this wash 2-3 times until the water runs clear. No more murky stuff-got it?
Step 2: The “Rest Period” (Let ‘Em Breathe)
Now, here’s a step a lot of people skip, but it’s crucial. After washing, put the worms back in a container with a little fresh water (just enough to cover the bottom-don’t drown ’em!). Let ’em sit for about 4 hours. Why? Because after being cooped up in a bait container or your tackle box, they’re stressed out. Giving ’em a little time to chill in fresh water helps them recover. But wait-don’t leave ’em longer than 4 hours! The water will run out of oxygen, and you’ll start finding dead worms floating to the top. I set a timer on my phone every time-no exceptions.
Step 3: Prep the Storage Container (Towel + Box = Happy Worms)
Okay, 4 hours are up-time to get them into their long-term home. Grab a small, airtight container (again, plastic food storage works-just make sure it’s clean!). Now, take a clean, damp towel (not soaking wet-wring it out until it’s just slightly moist) and line the bottom of the container with it. The towel keeps the moisture level just right-too dry, and the worms shrink; too wet, and they drown. Pro tip: I use old cotton dish towels-they’re absorbent and soft, perfect for worms.
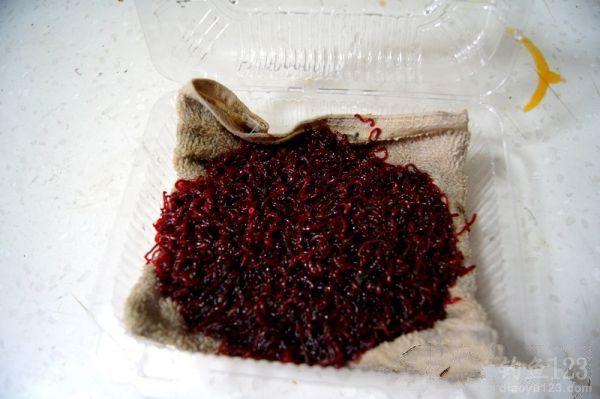
Step 4: Transfer & Prep for the Fridge
Now, take your worms out of the water. Gently pour them into a strainer to let any excess water drip off-don’t squeeze ’em! Once they’re mostly dry, spread them out on the towel in the container. Now, grab a single sheet of plain paper (I use paper towels, but plain printer paper works too) and lay it over the top of the worms. This helps keep the moisture consistent-if the towel gets too dry, the paper will hold a little moisture, and if it’s too wet, the paper will absorb excess. Perfect balance.
Now, seal the container? Wait-no! Wait a second. Worms need oxygen, so don’t seal it tight. Instead, poke a few small holes in the lid (I use a toothpick-easy peasy). Then, put the container inside a plastic bag (a zip-top bag works) and seal the bag loosely. This keeps the container from drying out in the fridge, but still lets air in. Genius, right?
Step 5: The Big Chill (Refrigerator Storage)
Now, put the bagged container in your fridge. But wait-where? Don’t put it in the freezer (duh, that’ll kill ’em), and don’t put it on the door (the temperature fluctuates too much there). Put it on a middle shelf, where it’s cool and consistent. The ideal temp is between 35-45°F (2-7°C)-most fridges are set around that, so you’re good.
Now, here’s the key maintenance step: every 4 days, you need to “refresh” the worms. Take the container out, dump the old towel and paper, wash the container (with plain water-no soap!), lay down a fresh damp towel, transfer the worms, add a new paper sheet, and put ’em back in the fridge. That’s it. I set a recurring reminder on my phone so I never forget-missing a refresh is the #1 way to kill your worms.
Common Mistakes I Made (So You Don’t Have To)
Let’s be honest-no one gets this right on the first try. I made my fair share of mistakes, and I’m gonna share ’em so you don’t waste time (and money) like I did.
Mistake 1: Skipping the Wash Step
Like I said earlier, this is a big one. Once, I was tired after a fishing trip and just tossed the leftover worms in a container without washing. Two days later, I opened it and almost gagged-stinky, mushy worms everywhere. Never again. Washing removes all the gunk that causes rot.
Mistake 2: Overcrowding the Container
Another time, I tried to cram 2 worms into a tiny container. Bad idea. They were all squished, and half of ’em died in a week. Give ’em space! A good rule of thumb: if you can’t see the towel between the worms, it’s too crowded. Use a bigger container if you have a lot of leftovers.
Mistake 3: Using Cold Tap Water Directly
Worms hate sudden temperature changes. Once, I was in a hurry and washed my worms with cold tap water. They started wiggling like crazy, and by the next day, half were dead. Room temp water only-trust me.
Mistake 4: Forgetting to Refresh Every 4 Days
This is the most common mistake I see. I once went on a 5-day trip and forgot about my worms. When I got back, the towel was dry as a bone, and all the worms were dead. Set a reminder-your future self (and your fishing trips) will thank you.
How Long Do These Worms Last? (My Personal Test)
You’re probably wondering: “How long can I actually keep these worms?” Let’s talk real numbers. Last winter, I bought a big cup of red worms for ice fishing. I used half, then stored the rest using my method. I refreshed ’em every 4 days, and by the time spring rolled around (like 3 months later!), I still had 80% of the worms alive. That’s insane! I didn’t have to buy new worms once during ice fishing season. Total game-changer.
Another test: I stored worms for 2 weeks without refreshing (don’t do this!)-half were dead. But with regular refreshing? 3 months easy. That’s the power of consistent maintenance.
Pro Tips for Even Better Red Worm Storage
Now that you know the basics, here are a few pro tips I’ve picked up over the years to make your worm storage even better:
- Use a Dark Container: Worms hate light-using a dark container (like a black plastic food storage box) keeps ’em calmer and less likely to stress out.
- Don’t Feed Them: Wait, what? Yeah, you heard me. If you’re storing worms for more than a week, you might think “I should feed ’em”-don’t. Any food will rot in the fridge and kill your worms. They’ll be fine on their own as long as the moisture is right.
- Check for Dead Worms Daily (At First): For the first few days, check the container once a day to make sure no worms are dead. If you find one, remove it immediately-dead worms release a chemical that kills other worms. Gross, but true.
- Bring a Small Container to the Lake: When you go fishing, don’t bring the whole big container of worms. Just take a small cup with a few worms-this way, you don’t stress out the rest of the worms with temperature changes from the tackle box.
Final Thoughts: Stop Wasting Money on Dead Worms!
Look, I get it-fishing is supposed to be fun, not a chore. But if you’re throwing away half your red worms every trip, you’re just throwing money away. This method is so simple, it takes like 10 minutes total to set up, and 5 minutes a week to refresh. And the payoff? Lively, fresh worms every time you hit the water, and more bites. What’s not to love?
Last month, I took a friend fishing who’s never stored worms before. He was shocked when I pulled out a container of wiggly, lively worms that were 2 weeks old. “I’ve never had worms last more than 3 days!” he said. Now he’s using my method too. So trust me-this works.
If you try this method, let me know how it goes! Drop a comment below (or hit me up on Instagram @[YourFishingHandle]-shameless plug) and tell me how long your worms lasted. And if you have any other worm storage tips, share ’em too-I’m always looking for new tricks.
Now go grab those leftover worms, give ’em a wash, and get ’em in the fridge. Your next fishing trip (and your wallet) will thank you. Tight lines!


