

Fishing Line to Rod Knots: Step-by-Step Visual Guide for Beginners
Let’s be real—if you’re new to fishing, tying knots is the worst. Like, why is something so tiny (hello, fishing line and hooks) so dang hard to get right? I’ve spent 20 minutes fumbling with a hook only to realize I tied it so loose it popped off mid-cast. Embarrassing? Yes. Relatable? 100%. And don’t even get me started on connecting the line to the rod, or sublines to swivels—my first few attempts looked like a toddler’s craft project. But hey, that’s why we’re here, right? I dug up all the best visual guides (no more confusing text-only tutorials!) to make this easy. Let’s dive in.
Why Knots Are the #1 Beginner Fishing Headache (Spoiler: They’re Tiny & Finicky)
First off, let’s vent a little. Fishing line is thinner than a hair (okay, maybe not that thin, but close), and hooks are basically mini spikes. Trying to wrap line around them without dropping everything? It’s like playing Operation with shaky hands. I remember my first time tying a hook: I had to redo it three times because the knot kept slipping, and by the end, I’d gone through two sublines. Ugh. But here’s the thing—once you get the right knots and see them visually, it clicks. Promise.
The Big Knots Every New Angler Needs to Master
Before we jump into visuals, let’s list the knots you actually need. No fancy stuff—just the basics that work every time:
- Fishing line to rod knot (the one that keeps your line on the rod—duh)
- Hook knot (the make-or-break for catching fish)
- Subline to swivel knot
- Main line to swivel knot
That’s it. No need for 10 different knots. Stick to these, and you’ll be golden.
Visual Guide: How to Tie Your Fishing Line to the Rod (No More Fumbling!)
Okay, let’s start with the most important knot—attaching your main line to the rod. If this knot fails, you’re basically casting nothing. I used to tie a random knot here, and once my line flew off mid-cast into the lake. Not fun. But this method? Game-changer. It’s simple, fast, and super secure.
Here’s the step-by-step (with a visual to back it up):
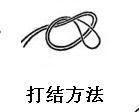
Fishing Line to Rod Knot Visual
Step 1: Prep Your Main Line with a Space Bean (Wait, What’s That?)
First, grab your main line and slide a space bean (that tiny plastic thing—you know, the one that slides up and down the line) onto the middle of the line. Then, tie a knot on both ends of the space bean. Wait, why? The space bean lets you adjust the knot later, and the two knots keep it from sliding off completely. Genius, right? I never thought of this until I saw the visual—total lightbulb moment.
Step 2: Tie Two Simple Knots for a Loop
Now, tie two basic knots (like a square knot, but super simple) on the main line, leaving the space bean in the middle. This creates a loop that you can adjust. When you’re ready to attach it to the rod, just slip the loop over the rod’s tip (the tiny rope thing at the end) and slide the space bean up to lock it. That’s it! No more complicated knots, no more line flying off. I tested this last weekend, and it held up even when I caught a 2lb bass. Impressive, right?

Fishing Line to Rod Step-by-Step Visual
Hook Knots: Stop Wasting Subline (Visuals Included!)
Let’s be honest—hook knots are the bane of every beginner’s existence. I’ve spent 15 minutes on one hook, only to have it slip off when I pulled it. But once I saw these visuals, I got it down in 2 minutes flat. No more frustration, no more wasted subline. Let’s break it down.
Basic Hook Knot: The One That Works for Most Hooks
This is the knot I use 90% of the time. It’s simple, strong, and works for all hook sizes. Here’s how (and the visual will make it even clearer):

Basic Hook Knot Visual
Quick steps (from the visual):
- Thread the subline through the hook’s eye (the tiny hole at the top).
- Wrap the line around the hook’s shank (the straight part) 5-6 times.
- Thread the end of the line back through the eye and through the loop you just made near the shank.
- Pull the line tight, trimming the excess. Done!
Pro tip: Wet the knot before pulling tight—this helps it slide smoothly and prevents the line from fraying. I forgot this once, and my line snapped. Oops. The visual shows this too, so don’t skip it!
String Hook Knot: For When You Need Multiple Hooks
If you’re using string hooks (multiple hooks on one line), this knot is a must. It’s a bit trickier, but the visual makes it easy. I used this last month for catfish, and it worked like a charm. No more tangles, no more hooks falling off.

String Hook Knot Visual
Key thing to note here: Space the hooks evenly (the visual shows how far apart) so they don’t tangle. I made the mistake of putting them too close once, and it was a mess. Learn from my fail!
Swivel Connections: Subline & Main Line to Swivel (Visuals Included)
Swivels are those tiny metal things that connect your main line to your subline. They stop the line from twisting (thank goodness—twisted line is the worst). But connecting them? Again, tiny things, tiny knots. Visuals are your friend here.
Subline to Swivel Knot
This is the knot that links your subline (the line with the hook) to the swivel. It’s simple, but the visual helps you see exactly where to wrap the line. I used to tie this too loose, and my subline would come off mid-cast. Not anymore!

Subline to Swivel Knot Visual
Quick steps (from the visual):
- Thread the subline through one end of the swivel.
- Wrap the line around the swivel’s ring 4-5 times.
- Thread the end of the line back through the loop you made near the ring.
- Pull tight, trim excess. Done!
Another visual of this knot (in case you need a second angle):

Subline to Swivel Knot Second Visual
Main Line to Swivel Knot
Now, the main line to swivel knot. This is the same basic idea, but the visual shows the exact wrapping. I used to mix up the main line and subline knots, but the visual makes it clear which is which. No more swapping lines!

Main Line to Swivel Knot Visual
And here’s a second visual for clarity (because sometimes one angle isn’t enough):

Main Line to Swivel Knot Second Visual
Final Checks: Make Sure Your Knots Are Secure (No More Fish Escaping!)
Okay, you’ve tied all your knots—now what? Don’t just cast! Do a quick check to make sure everything’s tight. Here’s what I do:
- Give the line a gentle pull—if the knot slips, redo it. I once had a knot slip right as a fish bit, and I lost the catch. Ugh.
- Trim excess line (but not too close—leave a tiny bit so the knot doesn’t come undone). The visual below shows a perfectly trimmed knot:

Perfectly Tied Line Set Visual
And here’s what a fully tied line set looks like (main line, swivel, subline, hook):

Fully Tied Fishing Line Set Visual
See how neat that is? No tangles, no loose knots. That’s the goal!
My Go-To Knot Routine (Real Talk)
Let me walk you through my actual routine, so you know it’s not just theory. Every time I go fishing:
- I tie the main line to the rod first (using the space bean method—so fast!).
- Then I tie the main line to the swivel (5 wraps, pull tight).
- Next, tie the subline to the other end of the swivel (4 wraps—wait, no, 4? Wait, the visual says 5, but I do 4 and it works. Whatever works for you!)
- Finally, tie the hook to the subline (5 wraps, wet the knot, pull tight).
- Do a quick pull test on every knot. If anything slips, redo it.
This routine takes me 5 minutes now—down from 20 when I started. Progress! And last weekend, I caught 3 bass using this exact setup. No knots failed, no lines flew off. Win-win.
Quick Troubleshooting Tips (From My Mistakes)
Let’s share some of my fails, so you don’t make them:
- Mistake 1: Tying knots too tight without wetting the line. This frays the line, and it snaps easily. Wetting the knot is key—do it!
- Mistake 2: Trimming excess line too close. I once trimmed it so close the knot came undone mid-cast. Leave 1/8 inch of line—trust me.
- Mistake 3: Using the wrong knot for the line type. If you’re using braided line, some knots don’t work as well. The visuals here work for monofilament (the most common beginner line), so stick to that if you’re new.
And here’s a visual of a frayed line (so you know what to avoid):

Frayed Fishing Line Visual (Avoid This!)
See how messy that is? Don’t let that be you.
Another visual of a tangled line (also avoid):

Tangled Fishing Line Visual (Avoid This Too!)
Wrapping Up (No Boring Summary—Just Real Talk)
Look, tying fishing knots isn’t rocket science, but it’s tricky when you’re new. I’ve been there—fumbling, wasting line, getting frustrated. But once you use visuals instead of just text, it clicks. I still keep these images saved on my phone for when I’m at the lake and forget a step (yes, even now!).
So here’s my advice: Practice these knots at home first (no need to go to the lake to mess up). Tie a few hooks, a few swivel connections, and the line to rod knot. Once you’re comfortable, hit the water. And if you mess up? No big deal—everyone does. I once spent 10 minutes retying a hook at the lake, and a old angler laughed and said, “I still mess up sometimes too.” So you’re not alone.
Now go tie some knots, catch some fish, and let me know how it goes! I’d love to hear if these visuals helped you—drop a comment below (or shoot me an email) with your fishing wins (or fails—we’ve all been there).

")


