
Why Slip Bobber Fishing Is a Winter Game-Changer (Especially in Southern China!)
Let’s be real: winter fishing up north can feel like a total drag. You’re out there huddled by a hole in the ice, reeling in tiny sunfish or “pumpkinseed” carp that barely make a dent in your cooler. But down in southern China? It’s a whole different vibe. The reservoirs are still teeming with monster fish, and the water’s deep—like, 10+ meters deep deep. Hand rods can’t reach that far, and raft fishing spots are so competitive you’d need to camp out overnight to claim one. So what do the local pros use? Slip bobber fishing, obviously! If you’re a newbie who’s never even heard of this method, don’t panic—I’m breaking down exactly how to build your first slip bobber rig, step by step.
What Even Is Slip Bobber Fishing, Anyway?
First things first: let’s clear up the basics. Slip bobber fishing is the ultimate method for targeting deep, distant monster fish in reservoirs. It uses a rod with a reel (so you have that crucial drag system for fighting big guys) and a floating rig that slides freely on your main line. The best part? Once you get the float tuned right, it’s just as sensitive as the suspended rigs used in traditional Taiwanese fishing. No more missing subtle bites from sluggish winter fish!
Step 1: Pick Your Rod and Reel (No Need to Break the Bank!)
You can’t build a slip bobber rig without the right gear, so let’s start with the foundation: your rod and reel.
- Rod: Go for a Surf Casting or Rock Fishing Rod
These rods come in two main types: regular and long-cast. The only real difference is the size of the line guides. Long-cast rods have bigger guides to reduce friction when throwing far, but regular rods work too—we’ve got a hack for dealing with small guides later. Don’t overthink this pick; both get the job done.
- Reel: Spinning Reel (With or Without Hand Brake)
A spinning reel is non-negotiable here, and if you can swing it, get one with a hand brake. Hand brakes make fighting fish way easier—you can control the line tension with one hand while reeling with the other. But let’s be honest: hand brake reels are pricy. If your budget is tight, a basic spinning reel works just fine. For size, go with a 3000 model if you’re using 3-pound test nylon line. It’s lightweight, holds enough line for most reservoir spots, and won’t weigh you down during all-day fishing trips.
Pro Hack: Thread Your Line Through the Guides in 10 Seconds Flat
Threading line through every tiny guide on a rock fishing rod is a huge pain—especially if you’ve got shaky cold hands in winter. But here’s a trick the locals swear by: look at the protective cap on the tip of your rod. There’s a thin wire loop (called a guide wire) that runs through all the rod’s guides, with a small hole at the end. Thread your main line through that hole, then pull the guide wire out. Boom—your line is instantly threaded through every single guide. No more fumbling with each tiny loop one by one!
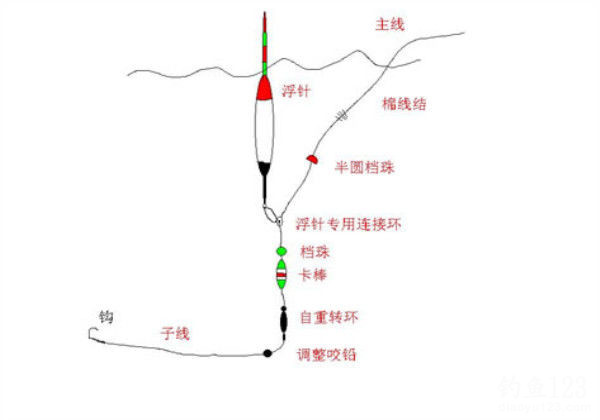
Step 2: Build the Slip Bobber Rig (The Main Event)
Now that your line is through the guides, it’s time to put the rig itself together. Follow these steps, and you’ll have a functional rig in no time:
- Start with a Stopper Bean
This is just a small plastic washer that stops your float seat from sliding too far up the line. You can find these on any fishing gear website for pennies—don’t skip this, it’s key to keeping your rig working right.
- Add a Slip Float Seat
Not all float seats are created equal! You need a slip-specific float seat, which has a brass ring that slides freely on your main line. Regular float seats get stuck, which defeats the whole point of a slip bobber rig. Spend the extra dollar on a good one—you’ll thank yourself later.
- Three Space Beans + Lead Sinker Holder
Slide three space beans onto the line after the float seat, then add a lead sinker holder with one more space bean below it. Here’s why each one matters:
- The top two space beans stop the float from sliding down to the sinker, which would cause your line to tangle. Slide them up to about 1.5 times the length of your float from the sinker holder—this is the sweet spot to avoid tangles.
- The bottom space bean locks the lead sinker holder in place, so your sinker doesn’t slide around while you cast or fight a fish.
- Single Hook vs. Double Hooks (Winter Edition)
After the sinker holder, you can either tie on a swivel for double hooks or just tie a single hook directly to the main line. Now, double hooks do increase your chances of hooking a fish, but winter fishing in reservoirs calls for caution. Reservoirs are in low water season in winter, so the bottom is cluttered with tree branches, weeds, and all sorts of snags. Double hooks mean double the chance of getting stuck. Even worse, if you hook a big fish, double hooks often lead to the fish getting “bridged” (one hook in the mouth, one in the body), which makes the fish thrash harder and almost always results in a broken line. Winter bites are already rare—don’t risk losing a trophy fish to a preventable mistake. Stick with a single hook for winter reservoir fishing.
The Most Important Step: Make a Cotton Line Stop for Small Guides
Remember earlier when I mentioned regular rock fishing rods have small guides that can block space beans? Here’s how to fix that. If you’re using a regular rod, you can’t use a space bean to stop the float seat from sliding past the rod tip—bean is too big and will get stuck in the guides. Instead, tie a cotton line stop above the stopper bean.
A cotton line stop is a tiny, tight knot made from cotton thread. It slides freely on your main line but has just enough friction to hold the stopper bean in place. Best of all, it’s soft and small enough to glide through even the tiniest rod guides without getting stuck or damaging your rod. And that stopper bean? It’s there because the cotton knot is so small that the float seat would slide right over it without a barrier. Together, the cotton knot and stopper bean keep your float from sliding too far up the line when you cast.
Wait, Can I Use This Rig Anywhere Else?
Absolutely! This slip bobber rig isn’t just for winter reservoir fishing. It works for any spot where you need to cast far or fish deep: rivers, large ponds, even coastal fishing spots. Once you get the hang of building and using it, it’ll become your go-to rig for targeting big fish everywhere.
One Last Secret (Can You Spot It?)
If you really want to take your slip bobber rig to the next level for real-world fishing, you need a second cotton line stop. Can you guess where it goes? Here’s a hint: it has to do with setting your fishing depth. Drop a comment below if you figure it out—I’ll give you a virtual high five if you get it right!
Disclaimer: This article is original content from Fishing 123. Unauthorized reproduction or reposting is strictly prohibited and will result in legal action.


")

