
DIY Fishing Tool: How to Make a Homemade Weed Trimmer Sickle for Bank Fishing
Let’s be real—bank fishing with weeds is a nightmare. You cast your line, it lands perfectly… then *snap*—your hook’s tangled in a clump of underwater grass. Cast again, same thing. By the third time, you’re ready to toss your rod into the lake and call it a day. Sound familiar? I’ve been there too many times.
Older anglers always seem to have the right gear, though. I’ve seen them pull out anchor hooks, rake-style tools, and yes—those trusty weed-cutting sickles attached to long poles. A few years back, I tried making a grass-trimming pole from a broken 9-foot rod. It worked… for a while. But after 3 years of repairs, it shrank from 5 feet to just under 4. Last winter, I tried trimming a weed bed 10 feet out and could barely reach it. Total bummer.
That’s when I decided to upgrade. I wanted a pole long enough to reach those distant weed beds—at least 7 feet. And guess what? I found a game-changing part at my local fishing shop: an aluminum threaded connector with a set screw hole. It’s made exactly for building weed-trimming poles! Plus, I had a 10-foot rod gathering dust in my garage. Perfect combo, right?
I documented the whole build with photos so you can copy it step by step. Let’s dive in!
What You’ll Need for This DIY Weed Sickle
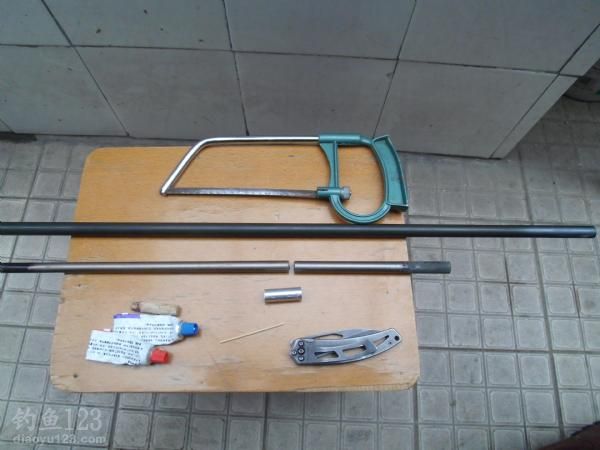
You don’t need fancy tools—just a few basics. Here’s my list:
- A broken or unused fishing rod (I used a 10-foot one; aim for at least 7 feet total length)
- A short section of fiberglass rod (to fit the connector)
- Aluminum threaded connector (with set screw hole)
- Wooden dowel plug (to fill the rod tip)
- AB glue (epoxy—super strong for bonding)
- Small hand saw (for cutting rods)
- Phillips screwdriver (to tighten the set screw)
- Folding knife (for trimming)
- Drill + small bit (to make a hole in the fiberglass rod)
Everything fit on a tiny folding stool—no workbench required. Easy peasy.
Step 1: Prep the Rod and Fiberglass Section
First, I took my 10-foot rod and removed the top few sections (the thinnest ones). Those are too flimsy for a weed cutter. Then, I grabbed a short fiberglass rod section—about 6 inches long—from an old rod I had lying around. The goal here is to get a piece that fits snugly into the aluminum connector (with a tiny gap for glue).
Next, I grabbed a wooden dowel plug. I needed one that would fit into the end of the fiberglass rod (again, snug but not tight). Why a plug? It keeps the glue from leaking through and adds extra strength. I sanded the dowel a little with a knife to get the perfect fit—you don’t want it wiggling around.
Step 2: Glue the Wooden Plug to the Fiberglass Rod
This part is straightforward: mix a small amount of AB glue (follow the package instructions—usually 1:1 ratio). Apply a thin layer inside the end of the fiberglass rod, then insert the wooden plug. Push it in until it’s flush with the rod’s end. Wipe off any excess glue with a paper towel—you don’t want messy drips.
Let the glue cure for at least 30 minutes. I grabbed a snack while I waited—patience is key here! You don’t want to mess up the bond before it’s dry.
Step 3: Attach the Aluminum Connector
Now for the fun part! The aluminum connector has a threaded end (to attach the sickle later) and a side hole for a set screw. First, I drilled a tiny hole through the fiberglass rod—right where the connector’s side hole will line up. The drill bit size should match the set screw (I used a 1/8-inch bit).
Next, mix another batch of AB glue. Apply a thin layer inside the aluminum connector, then slide it onto the fiberglass rod. Make sure the side hole on the connector lines up with the hole you drilled in the rod. Push it all the way on until it’s tight.
Once it’s in place, insert the set screw through the connector’s side hole and into the fiberglass rod’s hole. Tighten it with a Phillips screwdriver—snug, but don’t overdo it (you don’t want to strip the screw).

Step 4: Assemble the Full Pole
Remember my 10-foot rod? I kept 9 sections (each about 32 inches long) which added up to 7 feet total. Perfect for reaching those far-out weed beds! I slid the fiberglass/connector section into the top of the 10-foot rod (the thinnest end of the main pole).
Wait, let me double-check: the fiberglass section should fit into the main rod’s top section. If it’s too loose, you can wrap a little electrical tape around the fiberglass end for a tighter fit. But mine fit just right—score!
Step 5: Add the Sickle and Test It Out
Finally, screw the weed sickle into the threaded end of the aluminum connector. It should twist on easily—no force needed. That’s it! Your DIY weed trimmer is ready to go.

I took mine to the lake the next weekend to test it. I spotted a weed bed about 8 feet out—way too far for my old 4-foot pole. I extended the DIY sickle pole, swung it gently through the weeds, and *snip*—they cut like butter! No more tangled hooks, no more frustration. It worked like a charm.
Pro Tips for Your DIY Weed Sickle
Before you go, here are a few tricks I learned to make this build even better:
1. Choose the Right Rod
Pick a rod that’s sturdy—fiberglass or graphite works, but avoid ultra-light rods (they’ll bend too much). My 10-foot rod was a cheap one I didn’t use anymore—perfect for repurposing.
2. Don’t Skip the Set Screw
The AB glue is strong, but the set screw adds extra security. You don’t want your connector flying off mid-swing into the lake—trust me, that’s a disaster.
3. Make It Portable
One of the best parts? When you’re done fishing, you can collapse the pole and store the sickle separately. The whole thing fits into the main rod’s butt section, and you just pop the rod cap back on. It’s way easier to carry than those bulky store-bought weed cutters.

Final Thoughts: Why This DIY Is Worth It
Let’s be honest—store-bought weed trimmers are expensive. I saw one at the shop for $4! This DIY cost me maybe $10 (just the aluminum connector and AB glue—everything else was junk I had lying around). Plus, it’s longer and sturdier than the cheap ones. Win-win.
I’ve used mine for 2 months now, and it’s held up perfectly. No repairs, no loose parts. Last week, I was fishing a spot with thick lily pads—this bad boy cut through them like a hot knife through butter. I even showed it to a few guys at the lake, and they’re already planning their own builds.
If you’re tired of tangled hooks and short weed poles, give this DIY a shot. It’s easy, cheap, and way more satisfying than buying something off the shelf. Let me know how it goes—tag me in your photos if you build one!


")
