

DIY Fishing Knot Tying Tool: Save Money & Catch More Fish (I Learned the Hard Way)
Let’s be real—how many of you have skipped tying a proper knot because you didn’t have a knot tyer? 🙋♂️ I’ve been there. For years, I’d just wrap my leader around the main line and call it a day. Then one day, my favorite float (you know, the one that cost $20 and caught me 10+ bass?) went flying off mid-cast. Bye-bye float, bye-bye 20 feet of line, and bye-bye my fishing mojo for the rest of the weekend. That’s when I decided: enough with the lazy knots. I’m making my own damn knot tyer—and it’s cheaper than a cup of coffee.
Why Proper Knots Matter (And Why Skipping Them Is Stupid)
Okay, let’s get this out of the way first. If you’re thinking, “Meh, knots are overrated,” you’re wrong. Dead wrong. A bad knot can:
- Send your $50 lure into the next zip code
- Lose you a trophy fish (trust me, I’ve cried over that)
- Break your line when you least expect it (hello, tree branch snags)
I used to think, “It’s just a knot—how hard can it be?” Turns out, even pros mess up knots without a tool. A proper knot (like the improved clinch or Palomar) needs to be tight, consistent, and not weaken your line. Skipping that? You’re basically throwing money into the water. And yeah, I learned that the hard way. My float disaster? All because I tied a lousy overhand knot instead of a proper leader knot. Never again.
My DIY Knot Tyer: Materials (You Already Have This)
Here’s the best part: you don’t need fancy tools or expensive parts. This knot tyer uses ONE thing. One. Let me repeat: ONE ITEM.
- 1 standard paperclip (the big silver ones—no mini ones, they’re too flimsy)
That’s it. No hardware store runs, no Amazon orders. Just grab a paperclip from your desk, junk drawer, or that random pile in your tackle box (we all have one). Why a paperclip? It’s sturdy, flexible enough to bend, and cheap as dirt. Perfect for a DIY project that’s actually useful.
How to Make the Knot Tyer (5 Minutes Flat—No Skills Needed)
Let’s get building. This is so easy, even my grandma could do it (and she can barely use a can opener). Follow these steps, and you’ll have a working knot tyer in no time.
Step 1: Grab Your Paperclip
First, find a full-sized paperclip. Mini paperclips won’t work—they’re too small to handle line properly. Hold it in your hand like this:

Step 2: Straighten the Long Wire
Take the longer of the two wires on the paperclip and straighten it out. Use your fingers (or pliers if you’re fancy) to make it as straight as possible. Don’t worry if it’s not perfect—we just need it to be a straight “arm” for the knot.
Pro tip: If your fingers hurt, wrap the paperclip in a towel first. No need to be a hero here.
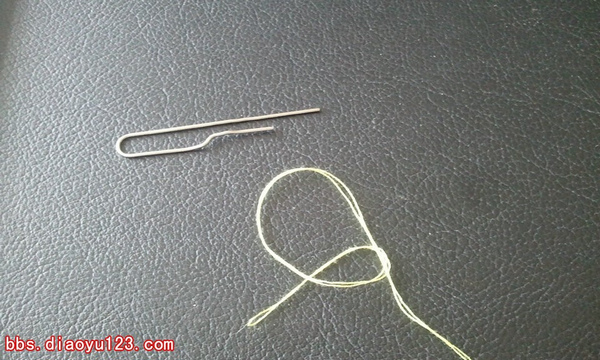
Step 3: Flip the Short Wire (Done!)
Now, take the shorter wire and flip it up and over the straight long wire. It should form a little “hook” or loop. That’s it. Your DIY knot tyer is ready to go. Seriously—how easy is that? I still can’t believe I spent $10 on a store-bought knot tyer before this.
How to Use Your DIY Knot Tyer (For Main Line & Leader Knots)
Okay, so you have your fancy new paperclip tool. Now what? Let’s walk through tying a leader knot (the most common one I use) step by step. This works for both monofilament and fluorocarbon lines—no exceptions.
Step 4: Set Up Your Line
First, thread your leader through the eye of your hook (or swivel) and tie a simple overhand knot. Leave a small loop—about an inch wide. Now, hold the main line and leader together so they’re parallel. That’s your starting point.
Step 5: Make an 8-Shape Loop
Take the end of the leader (the tag end) and wrap it around both the main line and the loop you just made. Make 5-7 wraps (more wraps = stronger knot, but don’t go crazy—8 is too many). Then, thread the tag end through the small loop you made earlier. It should look like an 8 now:
Step 6: Thread the Long Wire Through the Tag End
Grab your paperclip knot tyer. Take the straight long wire and thread it through the tag end of the leader. Make sure it goes all the way through—you don’t want it slipping out mid-tie.
Step 7: Flip the Short Wire Into the Big Loop
Now, take the short, flipped wire on your knot tyer and push it into the big loop of the 8-shape. This is the key step—don’t skip it! The short wire holds the loop open so you can pull the knot tight without messing it up.
Step 8: Pull & Tighten (Slowly!)
Hold the knot tyer with one hand and the main line/leader with the other. Start pulling slowly. You’ll feel the knot start to cinch down. Keep pulling until the knot is tight—but not so tight that you break the line. Adjust the width of the knot as you go (I like mine about 1/4 inch wide for strength).
Step 9: Push the Knot Off the Short Wire
Once the knot is mostly tight, use your thumb to push the knot up and off the short wire of the paperclip. Then, pull the long wire out of the tag end. Now, give the knot one final tight pull—make sure it’s snug against the hook eye or swivel.
Step 10: Trim the Tag End & Check Your Work
Snip the tag end with a pair of scissors (leave about 1/8 inch—don’t cut it too close). Now, give the knot a test pull. If it holds, you’re good to go! Here’s what a finished knot looks like:

Pros & Cons of This DIY Knot Tyer (Real Talk)
Let’s be honest—this isn’t a $50 professional knot tyer. But for what it is, it’s amazing. Here’s the real breakdown:
Pros (Why I Love It)
- Cheaper than dirt: 1 paperclip = $0.01 (maybe even free if you steal one from your kid’s homework)
- Super easy to make: 5 minutes, no skills required
- Works for multiple knots: I use it for leader knots, main line-to-rod knots, and even lure knots
- Portable: Toss it in your tackle box, pocket, or even your boat bag—no bulk
- Fun to make: Let’s be real, DIY projects are satisfying. Especially when they work
Cons (The Not-So-Good Stuff)
- Consistency: Store-bought tools are more precise, but for casual fishing? Who cares?
- Flimsy? No—paperclips are sturdy, but don’t yank it too hard (duh)
- Not for heavy line: If you’re fishing for marlin with 100lb line, this won’t work. Stick to 10-30lb line for best results
Overall? The pros way outweigh the cons. I’ve used this knot tyer for 6 months now, and I haven’t lost a single float or lure. That’s a win in my book.
Final Thoughts: Stop Being Lazy & Tie Proper Knots
Look, I get it—fishing is supposed to be fun, not a chore. But tying a proper knot is like putting gas in your car: you have to do it, or you’re not going anywhere. This DIY knot tyer takes 5 minutes to make and saves you money, frustration, and lost gear. What’s not to love?
Next time you’re heading out to the lake, grab a paperclip and give this a try. I promise you won’t regret it. And if you do? Well, at least you only wasted a paperclip. Let me know how it goes—tag me in your fishing photos on Instagram, and I’ll give you a shoutout!
Happy fishing (and no more lost floats!),
Jake


