The Easiest Salted Sandworm Recipe for Fishing
Let’s be real, if you’re into saltwater fishing, you know the struggle. Sandworms are the ultimate universal bait, right? But keeping them alive, especially when the weather gets hot, is a total nightmare. Even in a cooler, they might last two, maybe three days if you’re lucky. It’s a constant headache for every angler. I recently went on a trip to Qingdao and, honestly, got totally skunked—not a single fish for days! But the silver lining? I learned an incredible trick from the local veterans: how to salt and preserve sandworms. Almost all the shore anglers there use salted sandworms. After coming back, I dove deep into research, tried a bunch of methods, kept what worked, tossed what didn’t, and finally nailed down what I believe is the most convenient and effective way to salt sandworms. And guess what? I’m super excited to share this gem with all of you fellow fishing enthusiasts!

Why Bother Salting Sandworms?
First off, you might wonder, why go through all this trouble? Well, fresh sandworms are fantastic, but they’re fragile, perishable, and let’s not forget the smell. Salted sandworms, on the other hand, are game-changers. They become incredibly tough and durable on the hook, they last for months in your fridge, and from what the Qingdao pros told me (and my own testing confirms), their effectiveness at attracting fish is just as good, if not better in some cases, than fresh ones. Plus, the convenience factor is through the roof—no more last-minute bait shop runs or dealing with dead, smelly worms. You just grab what you need from your stash and go.
Step 1: Sourcing Your Sandworms
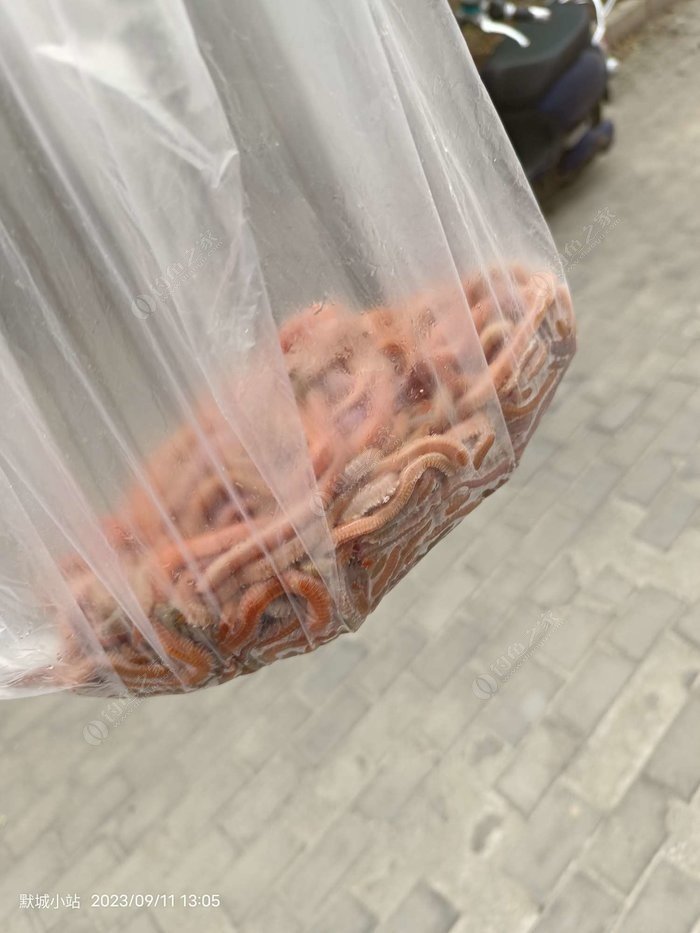
Alright, step one is getting your hands on some quality sandworms. In most coastal fishing areas, you’ll find vendors selling them. They’re usually sold by weight—think in terms of “portions” for a few bucks. Whether you buy $10 or $20 worth depends on your fishing style. If you’re setting up a bunch of rods or using them for bait strings, you’ll need more. For light tackle or float fishing, a small amount can last a whole day.
For this salting project, I went straight to a wholesale spot. I got a whole pound of red sandworms for $25. The best part? They were scooped right from the seawater, with no additives, so they were clean and ready to go. A crucial tip here: if you ever need to rinse sandworms, NEVER use fresh water. It’ll kill them instantly. Use seawater only.

Step 2: The Salting Process Begins
Now, for the fun part. You’ll need a container. I dug out an old, unused water pitcher—the size and depth were just perfect. Hey, learning new skills sometimes requires improvisation!
Gear Up and Get Ready
Here’s what you’ll need:
- Fresh sandworms
- Coarse sea salt (the best choice) or regular table salt
- A wide, shallow container
- Lots of paper towels or absorbent kitchen roll
- A flat tray or board for drying
Pour your sandworms into the container. Now, it’s salt time! The Qingdao master emphasized that coarse, unprocessed solar salt is ideal. But if you can’t find that, regular salt works just fine. I used standard pure sea salt. A side note: finding pure sea salt might become harder, which is a whole other frustrating topic… but let’s not get started on that.
The golden ratio is 2:1. For every 2 pounds of sandworms, use 1 pound of salt. Don’t be shy! Cover the sandworms completely with the salt, literally burying them in it.

The Waiting Game
Let this sit for about one to two hours. The salt will start drawing out the moisture from the worms. You’ll see liquid pooling at the bottom. This is exactly what we want.

Step 3: Draining and Drying
After a couple of hours, carefully pour off the excess liquid that the sandworms have released. Now, lay down several layers of absorbent paper on a flat surface. Gently scoop the sandworms out of the wet salt and spread them onto the paper. Let the paper soak up the extra surface moisture.
Once they’re not dripping wet, it’s time for another round of salt. This step is CRUCIAL. Adding more fine salt at this stage helps prevent oxidation and further regulates the moisture content, which is key for long-term preservation. Sprinkle a generous amount of fine salt over the sandworms.

The Mix and The Dry
Gently mix the sandworms with this new batch of salt, coating them evenly. Next, prepare your drying station. Take a board or a large tray and line it with fresh, dry absorbent paper. Spread the salted sandworms in a single, even layer on top.
Now, patience is key. The drying process takes a while—anywhere from 8 to 12 hours. Good airflow and low humidity can speed it up. Here’s the most important warning: DO NOT, I repeat, DO NOT dry them in direct sunlight! You’ll cook them and ruin everything. Air-dry in a shaded, well-ventilated area.
Change the absorbent paper underneath every hour or so for the first few hours. I changed mine three times at least. This helps wick away moisture faster and prevents any nastiness.

Step 4: The Final Product & Storage
I started this process in the evening, and because it was a bit humid, they weren’t perfect by bedtime. I left them overnight. The next morning? Perfection! The texture was spot on—flexible but not mushy, dry but not brittle. The color was great too. The key is not to over-dry them. If they get too dry and hard, they’ll be impossible to put on a hook.
Once they’ve reached that perfect, leathery consistency, transfer them to an airtight container. A glass jar or a plastic tub with a tight lid works great. Pop it in the refrigerator. These babies will last you for months, easily up to half a year!
Let’s talk value. I’ve seen small 50g packets of pre-salted sandworms selling for over $25 online. From one pound of fresh worms, I got about 4.5 to 5 ounces of premium salted bait. Do the math—the cost savings are insane! But beyond saving money, the sheer convenience is unbeatable. Want to go for a quick dawn fishing session? Just grab a few worms from your fridge and you’re out the door.

Putting It to the Test
Of course, I had to field-test them. I headed to the river the next morning. I hooked a salted worm and let it sit in the water. After about five minutes, it was still holding strong, not falling apart. According to the Qingdao old-timers, and my test seemed to confirm, salted sandworms are not only more durable but their scent and appeal to fish are absolutely top-notch. They might even outperform fresh ones because they’re tougher and stay on the hook longer.
A Note on Fancy Methods
I know there are a million recipes out there. Some people add sugar, brown sugar, shrimp powder, or all sorts of secret ingredients. The process can get super complicated. Look, if you’re fishing in a spot packed with fish, maybe those extras give you an edge. But for most of us just doing some casual shore fishing, keeping it simple is the way to go. This salt-only method is effective, reliable, and doesn’t require a chemistry degree.
So there you have it! My journey from frustrated angler with dying bait to having a fridge full of ready-to-go, effective sandworms. The process is straightforward, the results are fantastic, and your future fishing self will thank you. Give it a try next time you get your hands on some fresh sandworms. Tight lines, everyone!